CMS Introduction - Part 1: WYSIWYG Editor
Learn more about your content management system. When you log into the pilot, the first thing that opens up is Pages. Each page has four tabs: Content, Settings Tab, Metadata Tab, Code Tab.
[Back to CMS Overview]
Content Tab
The content tab is made up of the page Title and Body text. The body text can be formatted through the WYSIWYG editor.
WYSIWYG Editor (Heading 2)
The content of this page can be formatted by using the WYSIWYG editor:
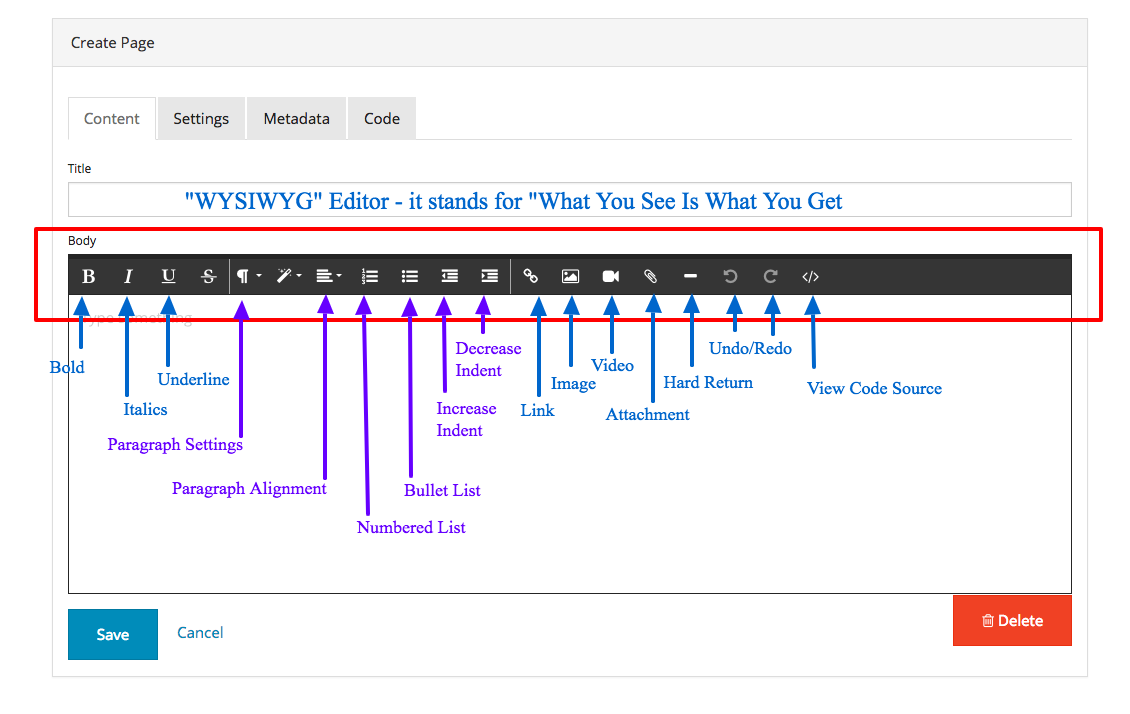
Basic Formatting (Heading 3)
Section 1: Bold, Italics, Underline, Srikethrough (Heading 4)
Bold: This is normal paragraph text, but bolded. This is a sentence. This is another sentence. Here's another sentence. And one more.
Italics: This is normal paragraph text, but italicized. This is a sentence. This is another sentence. Here's another sentence. And one more.
Underline: This is normal paragraph text, but underlined. This is a sentence. This is another sentence. Here's another sentence. And one more.
Strike Through: This is normal paragraph text, but using strikethrough. You'll probably never use it unless you're indicating a price cut, it's just a default setting in the WYSIWYG editor. But this is an example of what it looks like. This is a sentence. This is another sentence. Here's another sentence. And one more.
Section 2: Paragraph Settings
Format Block (Heading 5)
This is normal paragraph text - the style that happens by default when you just start typing. This is a sentence. This is another sentence. Here's another sentence. And one more.
This is text formated with the "quote" option from the paragraph tools. This is a sentence. This is another sentence. Here's another sentence. And one more.
This is text formatted for "code". You'll probably never use this, it's just a default setting in the WYSIWYG editor. This is a sentence. This is another sentence. Here's another sentence. And one more.
Format Block: Headings (Heading 6)
Throughout this page, you'll see that there are styled section headings and in parentheses next to them, I have a heading number so you can know that that looks like.
There are a few tips for headings that, if you follow, it will boost your search engine optimization (SEO):
- Headings make it easier for website visitors to read longer content pages.
- Use keywords or phrases in your headings, but make it readable.
- Don't use Heading 1. Your page title is automatically formatted as Heading 1, which indicates that everything else on the page is about whatever the title is.
- If you're going to use headings, start with Heading 2.
- If you use any heading 2-6 more than once on a page, do so to indicate the same level of heirarchy.
Block Style
You probably won't use these, but here's examples of what this does:
Italics: If you italicize something, you'll probably do so using the first option and not this one. This is a sentence. This is another sentence. Here's another sentence. And one more.
Typewriter: You'll probably never use it - it's just a default setting in the WYSIWYG editor. But this is an example of what it looks like. This is a sentence. This is another sentence. Here's another sentence. And one more.
Spaced: You'll probably never use it - it's just a default setting in the WYSIWYG editor. But this is an example of what it looks like. This is a sentence. This is another sentence. Here's another sentence. And one more.
Uppercase: This is another default setting in the WYSIWYG editor, but you may use this at some point. By using this, you can make something all caps, but also know it's spelled correctly if you have a spellcheck tool built into your internet browser. This is an example of what it looks like. This is a sentence. This is another sentence. Here's another sentence. And one more.
Lists & Indetions
I've used the numbered list to tell you how to create a link (lower in the page) and the bulleted list to provide some tips on using headings.
Indent More: This is normal paragraph text, but indented. This is a sentence. This is another sentence. Here's another sentence. And one more.
Indent More (again): This is normal paragraph text, but indented "more" twice. This is a sentence. This is another sentence. Here's another sentence. And one more.
Indent Less: This is normal paragraph text, but indented "more" twice and then "less" once. This is a sentence. This is another sentence. Here's another sentence. And one more.
Section 3: More Tools
Creating Links
Here's an example link. To create a link:
- Type the words you want linked,
- Highlight those words (select them) with your mouse or using "shift" and arrow keys,
- Click on the link icon and past the desired URL where you see "http://"
- If you're linking to someone else's website, check the "open in a new tab" box.
Tip: If you're linking to an internal page, all you have to paste in the "http://" area is the path. (Check out the Metadata tip page to learn more about paths.)
Adding Photos


You can also insert a picture, center it, or left or right align it. Click on the image icon to upload a picture, then you can make it break text (like our Olive Oil who's trying to get centered), and even make it a link. To really format image size, click on "Show HTML" and customize the image width or height. I've customized a few images on here so you can see how it's done.
Adding Video
To insert a video, first it needs to be uploaded to YouTube or another video hosting platform. Then click the video icon and either paste the YouTube link or the embed code into the provided space.
Here's a video of how to get HEX color values from an image.
Uploading File Attachments
You can add attachments as links to your website content using the "upload file" option. To give you an example, I'm going to provide you with a few images with guides of how to use the Settings, Metadata, and Code tabs.
When you upload a file, click on the underlined file name to customize the display name and if you want it to open in a new tab.
Hard Return
A hard return creates a line across the page. These can be used to break up sections visually as I've used here between the sections that use Heading 4.